本文分析了ReentrantLock结合AQS加锁的全过程
Doug Lea大神高屋建瓴
UML

关键代码分析
AQS#acquire
方法说明
- AQS中最为核心的方法
- 这是一个模板方法模式,AQS虽然实现了acquire,和release方法,但是里面调用的tryAcquire和tryRelease是由子类来定制的
- 可以认为同步状态的维护、获取、释放动作是由子类实现的功能,而动作成功与否的后续行为由AQS框架来实现
- 相当于AQS做了架构设计,具体的实现由我们自己定义
- 该方法对线程的中断不能及时响应(jdk提供了acquireInterruptibly()该方法可以及时响应中断)
- ReentrantLock类持有Sync类,而Sync类是AQS的子类
1
2
3
4
5
public final void acquire(int arg) {
if (!tryAcquire(arg) &&
acquireQueued(addWaiter(Node.EXCLUSIVE), arg))
selfInterrupt();
}
整体流程
- tryAcquire#具体实现由子类提供,该方法去获取锁成功返回true反之false
- addWaiter#将获取失败的线程加入到队列的尾部
- acquireQueued#线程进入队列后不会立即挂起,acquireQueued方法会让线程进行自旋,当满足挂起条件的时候(前置节点状态为SIGNAL)挂起该线程
- selfInterrupt#线程自我中断
ReentrantLock#NonfairSync#nonfairTryAcquire
Ps:模板方法tryAcquire的具体实现1
2
3
4
5
6
7
8
9
10
11
12
13
14
15
16
17
18
19
20
21
22
23final boolean nonfairTryAcquire(int acquires) {
final Thread current = Thread.currentThread();
//此时AQS的state代表当前线程获取原子状态的次数,如果次数为零,那么就说明这个线程放弃了锁(也有可能其他线程占据着锁从而需要等待),
//如果次数大于1,也就是获得了重进入的效果,而其他线程只能被park住,直到这个线程重进入锁次数变成0而释放原子状态。
int c = getState();
if (c == 0) {
//不同线程同时执行CAS操作,只有一个能成功获取到锁
if (compareAndSetState(0, acquires)) {
//获取到锁的线程,将被设置为当前的独占线程
setExclusiveOwnerThread(current);
return true;
}
}
//如果当前线程本就持有锁,那么增加state的值
else if (current == getExclusiveOwnerThread()) {
int nextc = c + acquires;
if (nextc < 0) // overflow
throw new Error("Maximum lock count exceeded");
setState(nextc);
return true;
}
return false;
}
Ps:关于AQS的state
- ReentrantLock用它来表示所有线程已经重复获取该锁的次数
- Semaphore用它来表示剩余的许可数量 Ps共享锁采用的就是这个
- FutureTask用它来表示任务的状态(尚未开始、正在运行、已完成以及已取消)
AQS#Node
1 | static final class Node { |
Node节点中最核心的是waitStatus,此处waitStatus的取值分别可以为:
1表示等待的线程已经取消或者中断;
-1表示后一个节点需要唤醒,当前节点如果释放锁,则需要唤醒后继节点;
-2表示当前的节点是一个条件等待,即需要等待其他的条件满足才能够被加入到同步队列,等待被唤醒
-3表示下一个acquireShared应无条件传播(在读写锁中会遇到,后面会专门写文章分析读写锁)
0表示初始状态
AQS#addWaiter、AQS#enq
1 | private Node addWaiter(Node mode) { |
1 | private Node enq(final Node node) { |
AQS#acquireQueued()
node插入队尾之后,不会立刻挂起,如果前置节点是head会尝试执行自旋;
自旋失败会执行shouldParkAfterFailedAcquire方法,该方法
1)判断前置节点是否为-1,如果是那么可以安全挂起
2)如果不是,清除无效的线程(被取消)
3)cas将pred状态置为-1,下次再进入该方法返回true,可以安全挂起当前线程1
2
3
4
5
6
7
8
9
10
11
12
13
14
15
16
17
18
19
20
21
22
23
24
25
26
27final boolean acquireQueued(final Node node, int arg) {
boolean failed = true;
try {
boolean interrupted = false;
for (;;) {
final Node p = node.predecessor();
//如果node的前置节点是头节点
//这里有一个有意思的地方,在队列里面是公平的排队获取锁,所谓的非公平是指队列里被释放的node和新来的尚未入队的node
if (p == head && tryAcquire(arg)) {
//自旋成功,这个head没啥用
setHead(node);
p.next = null; // help GC
failed = false;
return interrupted;
}
//当p的waitStatus为SIGNAL的时候第一个条件才返回true
//Ps只有当前置节点状态为SIGNAL的时候,当前节点才能被安全地挂起
//对线程的中断不能及时响应
if (shouldParkAfterFailedAcquire(p, node) &&
parkAndCheckInterrupt())
interrupted = true;
}
} finally {
if (failed)
cancelAcquire(node);
}
}
AQS#shouldParkAfterFailedAcquire
1 | private static boolean shouldParkAfterFailedAcquire(Node pred, Node node) { |
AQS#parkAndCheckInterrupt
1 | private final boolean parkAndCheckInterrupt() { |
执行流程图

透过实例看Node
1 | public static void main(String[] args) { |
线程5获取锁时候此时Node结构如下,可以看到head节点是一个空节点,刚入队的node的状态为0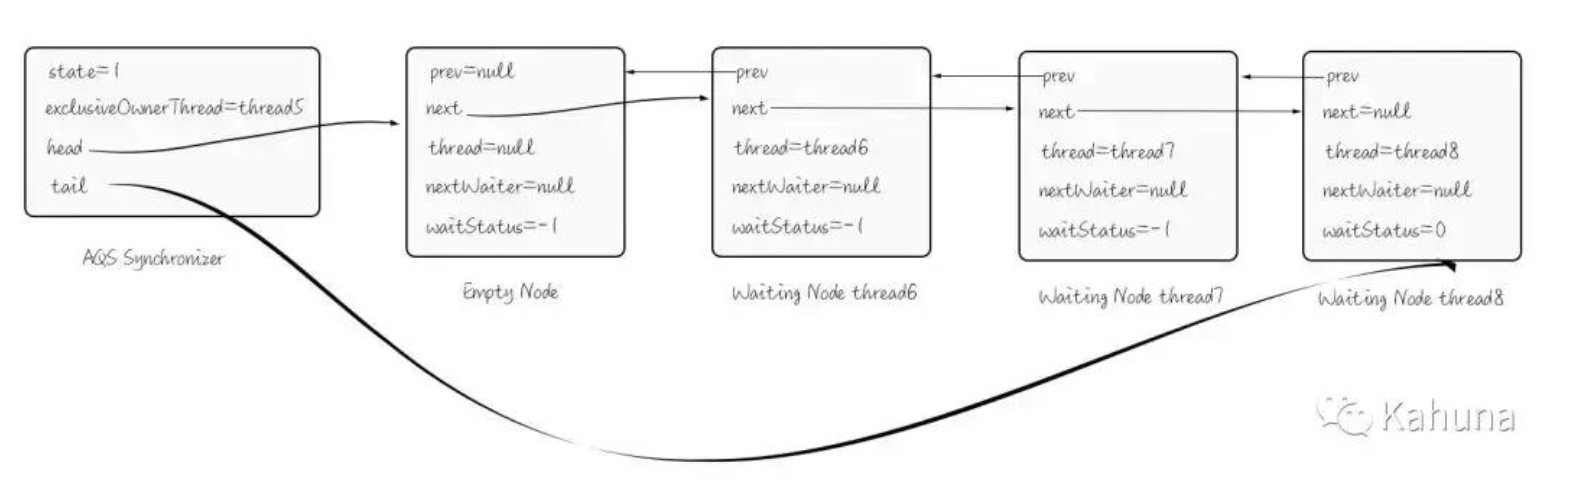
与Condition的联动
我们知道condition的await/signal方法经常和ReentrantLock联动,深入源码看看二者的关系
Condition类位于AQS中1
2
3
4
5
6public class ConditionObject implements Condition, java.io.Serializable {
/** First node of condition queue. */
private transient Node firstWaiter;
/** Last node of condition queue. */
private transient Node lastWaiter;
}
而Node的结构是这样的1
2
3
4
5volatile int waitStatus;
volatile Node prev;
volatile Node next;
volatile Thread thread;
Node nextWaiter;
私以为这样设计虽然最大程度实现了复用但是可读性不强,这里的waitStatus等于2的时候表示的是位于Condition队列中的节点,而Condition队列就是nextWaiter,显然这是一个单向队列,而且显然一个Condition对应一个等待队列。
提起Condition必然要看它核心的await/signal方法,我们知道这二者都需要调用它们的线程持有锁资源,不然会直接报错
先看看await方法1
2
3
4
5
6
7
8
9
10
11
12
13
14
15
16
17
18
19
20
21
22
23
24
25public final void await() throws InterruptedException {
if (Thread.interrupted())
throw new InterruptedException();
//向waiter队列添加node
Node node = addConditionWaiter();
//释放资源,显然当前线程位于同步队列的头部
int savedState = fullyRelease(node);
int interruptMode = 0;
//如果不在同步队列中
while (!isOnSyncQueue(node)) {
//挂起当前线程
LockSupport.park(this);
//检查中断
if ((interruptMode = checkInterruptWhileWaiting(node)) != 0)
break;
}
//其他线程调用signal后,当前线程被唤醒会执行这段代码,此时该线程的node已经位于同步队列中了
//和调用lock一样,进入队列后并非立即挂起
if (acquireQueued(node, savedState) && interruptMode != THROW_IE)
interruptMode = REINTERRUPT;
if (node.nextWaiter != null) // clean up if cancelled
unlinkCancelledWaiters();
if (interruptMode != 0)
reportInterruptAfterWait(interruptMode);
}
看看addConditionWaiter1
2
3
4
5
6
7
8
9
10
11
12
13
14
15
16
17private Node addConditionWaiter() {
Node t = lastWaiter;
// 清除等待队列中的无效node(status>0)
if (t != null && t.waitStatus != Node.CONDITION) {
unlinkCancelledWaiters();
t = lastWaiter;
}
//构造node,注意这里的CONDITION = -2;
Node node = new Node(Thread.currentThread(), Node.CONDITION);
//入队操作
if (t == null)
firstWaiter = node;
else
t.nextWaiter = node;
lastWaiter = node;
return node;
}
入队之后释放当前锁资源1
2
3
4
5
6
7
8
9
10
11
12
13
14
15
16
17
18final int fullyRelease(Node node) {
boolean failed = true;
try {
//重入次数
int savedState = getState();
//更新AQS当前线程以及state值
//唤醒同步队列后面挂起的线程
if (release(savedState)) {
failed = false;
return savedState;
} else {
throw new IllegalMonitorStateException();
}
} finally {
if (failed)
node.waitStatus = Node.CANCELLED;
}
}
await方法大概就是这样了,接着看看signal方法干了啥1
2
3
4
5
6
7
8
9public final void signal() {
//是否持有锁,未持有报错
if (!isHeldExclusively())
throw new IllegalMonitorStateException();
Node first = firstWaiter;
if (first != null)
//释放等待队列的头节点
doSignal(first);
}
1 | private void doSignal(Node first) { |
1 | final boolean transferForSignal(Node node) { |
主流程到这里就结束了,利用AQS内部的两个队列(一个双向一个单向)实现了lock与conditon的联动
ReentrantLock自问自答
1.如何竞争一把锁?
ReentrantLock内部使用AQS来维持一整套锁机制,在两个线程同时调用lock方法时,会通过CAS同时对state状态进行更新(此时为0,欲更新为1)
compareAndSetState(0, acquires);
更新失败的线程会进入AQS『监狱』-Node链中,会放到队尾;但是此时该线程不会被立刻挂起,还会执行一段时间的自旋
,直到当前的node的前置node状态(volatile status)被置为SIGNAL
2.为什么说是非公平的?公平锁如何实现有啥缺点?
因为之前获取锁失败的线程可能正在queue(node链)中排队,而新来的一个线程直接调用cas操作去获取锁;公平锁相对非公平锁很简单,就是在新线程执行CAS之前
判断下queue中是否有等待的线程,如果没有才能执行CAS操作,公平锁效率可能会低一些,可能每个线程都要经历从内核态到用户态的切换比较耗时
参考资料
http://ifeve.com/%E9%80%8F%E8%BF%87reentrantlock%E7%AA%A5%E6%8E%A2aqs/
https://www.jianshu.com/p/28387056eeb4